Showing posts with label vSphere4. Show all posts

Saturday, June 25, 2011

Creating a VMware Virtual (Home) Lab for VMware VCP & VCAP - Step Three: HA Funny Stuff

This article is part of my Virtual Lab Series.

In the first part of this series I discussed the over all design of this lab.
In the second part of this series I discussed how I installed ESXi.
In this third part I discuss some of the quirks of VMware HA I encountered.

I'm finally getting around to picking up my virtual lab again.  Due to work commitments I really haven't had any time to dedicate to the lab recently.  Right after I finished the previous article, I couldn't get HA to configure.  I created a cluster but if I added the hosts and tried to enable HA, it would fail.

The first error was around memory allocation...  uh oh.  Looks like the memory tweaks in my previous article don't hold up if you want to enable HA.  I bumped up the memory to 2GB and the memory allocation error went away but I still had a super generic error message: HA agent on in cluster in has an error: Cannot complete the HA configuration

Great... All the usual tricks didn't work (remove the host, add it back, enable HA again, double check DNS, etc). Finally, I bumped the memory to 2.5 GB, still nothing. As a last resort I reinstalled and made the local disk 10GB instead of 5GB (and kept the memory at 2.5 GB just because I can).

It worked! I reinstalled the second host and it also worked the first time. Due to the overall quirky nature of VMware HA (HA and I have a long history together and it's not all good) I can't say for sure if either the memory or disk change did the trick but I thought I'd pass it along.

Wednesday, April 27, 2011

New Best Practice for Creating an ESXi Default Scratch Partition?

Some interesting blog posts came about yesterday with the start of this article on ESXi Scratch Partition Best Practices on the VMware ESXi Chronicles Blog.  This VMware KB article includes more technical detail as well as a resolution.  In the KB article, it states that many SAS and Boot From SAN(BFS) installations will NOT create a default scratch partition at install due to the possible shared nature of both the SAS and BFS architectures.

Both Scott Lowe and Forbes Guthrie followed up with articles based on previous ESXi installation experience.  Their great articles started me thinking one step further.  Since I tend to think of servers in terms of Cisco UCS these days, doesn't this mean that ALL Cisco UCS (and most other vendor servers as well) will not have a default scratch space because most installations are now either SAS or BFS??  If this is the case, shouldn't this KB article represent a new best practice for ALL installations of ESXi in the future as well as all installations in the past??


UPDATE:  Jeremy Waldrop shared with me that many of his UCS BFS installs include the scratch space by default and Scott Lowe shared on his blog that sometimes his didn't.  Looks like we have a "feature" on our hands where sometimes the scratch partition is created and sometimes it isn't.  My recommendation to everyone is to make sure you check for the partition post installation until we gather more information on the subject.


Does this need to be a best practice?  I'm sure the answer here will be "it depends."  It depends on how much of a difference not having the scratch space is to you.  Read the KB article carefully and understand what you are losing by not having a default scratch partition.  From reading the article, it seems worth it to me.  What are your thoughts?

Creating a VMware Virtual (Home) Lab for VMware VCP & VCAP - Step Two: Install AD/DNS & ESXi

This article is part of my Virtual Lab Series.

In the first part of this series I discussed the over all design of this lab.
In the second part of this series I discussed how I installed ESXi.
In the third part I discuss some of the quirks of VMware HA I encountered.

Step One: Install AD & DNS
Nothing sexy here.  I created a w2k3 R2 standard edition virtual machine and then did a dcpromo to make it both my Active Directory and DNS server.  My domain is called VIRTUALLAB with a DNS name of virtuallab.local

Step Two: Install ESXi
I covered this in my post on how to install ESXi in Fusion.

Step Three: Configure ESXi
I will only cover this for the first server but I completed the steps for ESXi2 as well.

We first want to configure the network on the ESXi host.  Hit F2 from the ESXi splash screen and then choose Configure Network Management:

Select IP Configuration and you will see the following screen.  Modify the IP address to static and enter the IP of the host as well as the default gateway (it will always be XXX.XXX.XXX.2 in Fusion):

Return to the previous screen and select DNS Configuration.  Enter the DNS Server and the hostname:

Return to the previous screen.  I'm not 100% sure if it is needed, but I always add the DNS suffix as well.  Better safe than sorry. Choose Custom DNS Suffixes and enter the DNS entry:


Step Four: Prepare the ESXi host & join the Active Directory
Using the VI Client, connect to the ESXi host and point NTP at the AD server.  This step is needed to keep Kerberos in sync:

Create a Group an ESX Admins group in Active Directory (it must be EXACTLY like that).  Thanks to Maish and Brian for information on this.  Create the proper users and populate the group.  Once this is complete, insert the ESXi host into the domain:


Because you already created the ESX Admins group, the permissions are set for you automagically!

Step Five: Configure DNS
Create an A record in DNS (I also add a reverse look up entry):

Step Six: Test
You should now be able to log into the server using your Active Directory credentials:

Next up, Creating the Virtual Center Server

Tuesday, April 26, 2011

Creating a Virtual (Home) Lab for VMware VCP & VCAP - Step One: Design

This article is part of my Virtual Lab Series.

In the first part of this series I discussed the over all design of this lab.
In the second part of this series I discussed how I installed ESXi.
In the third part I discuss some of the quirks of VMware HA I encountered.

A few months ago I attempted to create a Virtual Lab based on my laptop but due to work and life craziness, the project fizzled.  It's now time to pick it back up and provide some clarity and direction to the project.  Consider this a reboot.

First off, what am I trying to do?  I wanted a lab to help study for VCAP but this could easily be used for VCP as well.  I decided not to purchase dedicated servers and storage because I really don't want all that gear at my house.  I manage enough hardware on a daily basis, no need to add to that.

What hardware do you need?  I recommend the maximum amount of memory your PC will support as well as an SSD based disk to handle the IOP's the virtual machines will create.  I've tried this on a regular HD in the past, trust me, it's very painful.  My MacBook Pro now has 8GB and a 240GB SSD.  Details on that are here.

What can you do in the lab?  The goal of this lab isn't to provide an environment to run a bunch of virtual machines.  Because I'll be running ESXi inside Fusion (Player and Workstation work great as well), that really isn't the intent here.  The focus is on Virtual Center and ESXi, not the virtual machines.

What other benefits are there to the virtual lab?  Two other major benefits are that the lab is always with me since it is on my laptop and it is much more cost effective (8GB RAM and SSD = $500-700 vs. Dedicated Home Lab = $2k+)

What will the project look like?  Here is a quick graphic of what I hope to be the end result.  I will have two ESXi hosts, a Virtual Center server, an AD, DNS & SMTP relay, and lastly a storage VSA for iSCSI and NFS mounts.  For details on how I "trick" the Fusion/Player/Workstation networking by using static IP's instead of DHCP, see this article.  That's it for today, next time we'll install ESXi!


Monday, March 21, 2011

Updates to Cisco UC on UCS Blades

Cisco recently announced a pretty big change to the support of Cisco Unified Communications (UC) products on the UCS B-series blade servers.  For select UC applications, the following features have been added to the support statement:

  • VMware ESXi 4.1 is now a supported hypervisor
  • Boot from FC is now supported for ESXi and a diskless configuration has been tested
  • limited vMotion is now supported but VMware DRS is not (i.e. you can manually move machines around if you have a need but VMware won't load balance them for you)
  • Cloning of vm's (clone at the vm level and then CUCM CLI) now allows template based installations to accelerate provisioning
All of the details can be found at the Cisco UC on Virtualization Wiki.  As the Cisco UC support statements are updated, I will post updates here.

Oh, and by the way, Cisco UC is fully supported on VCE Vblocks today...

Friday, March 18, 2011

Introducing the VMware vSphere Client for the iPad!

Wow, VMware just released something that is so cool!  The vSphere Client for Apple's iPad hit the Apple Store today and it's FREE!!

What does the vSphere Client for iPad do?

The vSphere Client for the iPad is designed to provide a clean and simple interface to many common tasks performed by vSphere Administrators.  It isn't designed to be a fully functional replacement to the Windows client, but functions in the iPad version include:
  • View performance metrics of the hosts and virtual machines
  • Manage virtual machines (start, stop, suspend)
  • View and restore virtual machine snapshots
  • Place vSphere hosts into maintenance mode and reboot hosts
  • Test connectivity to hosts and virtual machines using built-in ping and traceroute tools
Here are a few screenshots (Click on the image for a larger version):


How does this magic work?

The iPad Client connects to a proxy virtual machine, the vCMA (vCenter Mobile Access).  If you aren't familiar with the vCMA it works with many SmartPhones as well as the iPad and in the newest version SSL is now enabled by default!  Here is a graphic to show the architecture:


How do you install the vSphere for iPad Client?

Installation is a two step process.  It is very straightforward and VMware has actually created two videos to explain each step.  Here are both of the videos:


What if I have questions or need support for the iPad vSphere Client?


Head on over to the new VMware Community created just for the product.  It was created as-is with the support given by the community but I'm sure there will be a lot of activity and discussions in the near future.  Have fun with the new toy!

Wednesday, February 2, 2011

Installing and Tweaking ESXi for VMware Fusion

This article is part of my Virtual Lab Series.

NOTE: If you want to enable VMware HA on your cluster, you might want to read this article first.  I *THINK* I had to bump up the memory to 2.5GB and the disk to 10GB.  Your results may vary!

Now that the SSD is installed in my laptop, it's time to throw some virtual machines at it!  I'm going to start by installing and tweaking ESXi in preparation for creating linked clones of this template to run my virtual vSphere Cluster.  If you've installed ESXi in a virtual machine before, skip ahead to the memory tweaks section; it has changed a bit with ESXi 4.1 as you'll see below.

Start by creating the virtual machine in Fusion and choosing VMware ESX as the OS:

Before clicking Finish, click Customize Settings:

Change the size of the Hard Disk from the default of 40GB to 5GB:

The rest of the install is a standard ESXi install.  The only issue I had was some keyboard "funkiness".  Some Function keys required me to hold down the Command key in addition (F11 was Command-F11 for instance).  I haven't assigned a machine name or static IP address yet because I'm going to create Linked Clones in Fusion so I will personalize the installs after the split.  After install, ESXi only consumed about 2.4 GB of disk space on the SSD.

The last step is to tweak the memory consumption of ESXi.  As stated in Duncan's original article and my previous post on setting this up in VMware Player, you can "trick" ESXi into using less than 2GB of memory by removing the memory check.  We have to perform a few additional steps is ESXi 4.1 because Tech Support Mode is disabled by default as shown below (Alt-F1 to see this and Alt-F2 to flip back to the ESXi screen)

Enable Local Tech Support Mode under the Troubleshooting Options menu:

With Local Tech Support enabled, we can now log in to the console on the ESXi virtual machine (remember Alt-F1 to flip to the Tech Support screen).  Log in as root:

As per Duncan's article, edit the /etc/vmware/esx.conf and add the line:
/vmkernel/minMemoryCheck = “false”

Once the entry is in place, shut down the server and set the memory to 1700 MB.  In ESXi 4.0 we could set it as low as 1200 MB but ESXi 4.1 seems to require a bit more.  What happens when you set the memory too low you ask?  The server will PSOD on boot like this:

Once all of this is complete, you should have a bootable ESXi virtual macine in a minimal footprint (less than 3GB of SSD and 1.7 GB of memory) and this will serve as a nice base configuration for our linked clones in the next article.


Tuesday, January 11, 2011

Installing a MacBook Pro SSD for a VMware Virtual Lab

This article is part of my Virtual Lab Series.

I decided recently to upgrade the hard disk in my MacBook Pro to a Solid State Disk (SSD) so I can run a "Data Center in a Box", much like the previous one I created before.  This post will cover the installation of the SSD and subsequent articles will cover the set up and configuration of my new DC in a box.  As you will see in this post, I know just enough about the Mac platform to be really dangerous!

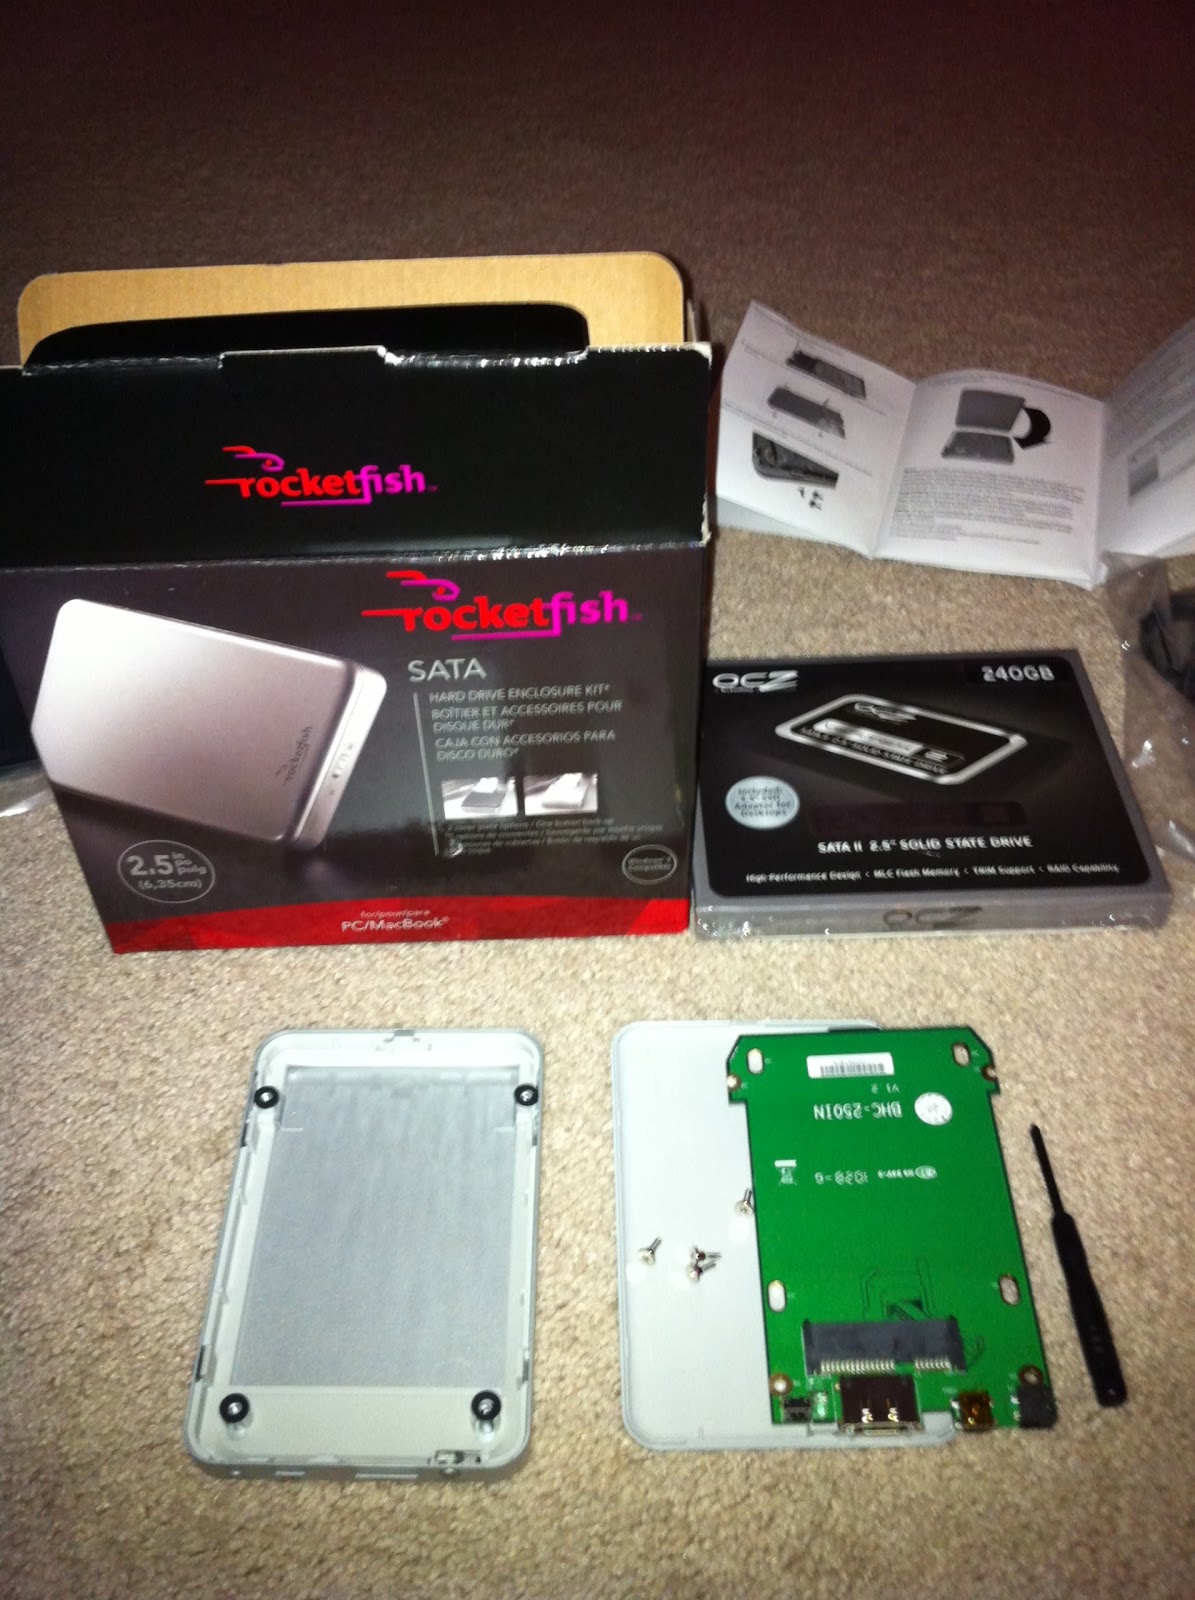
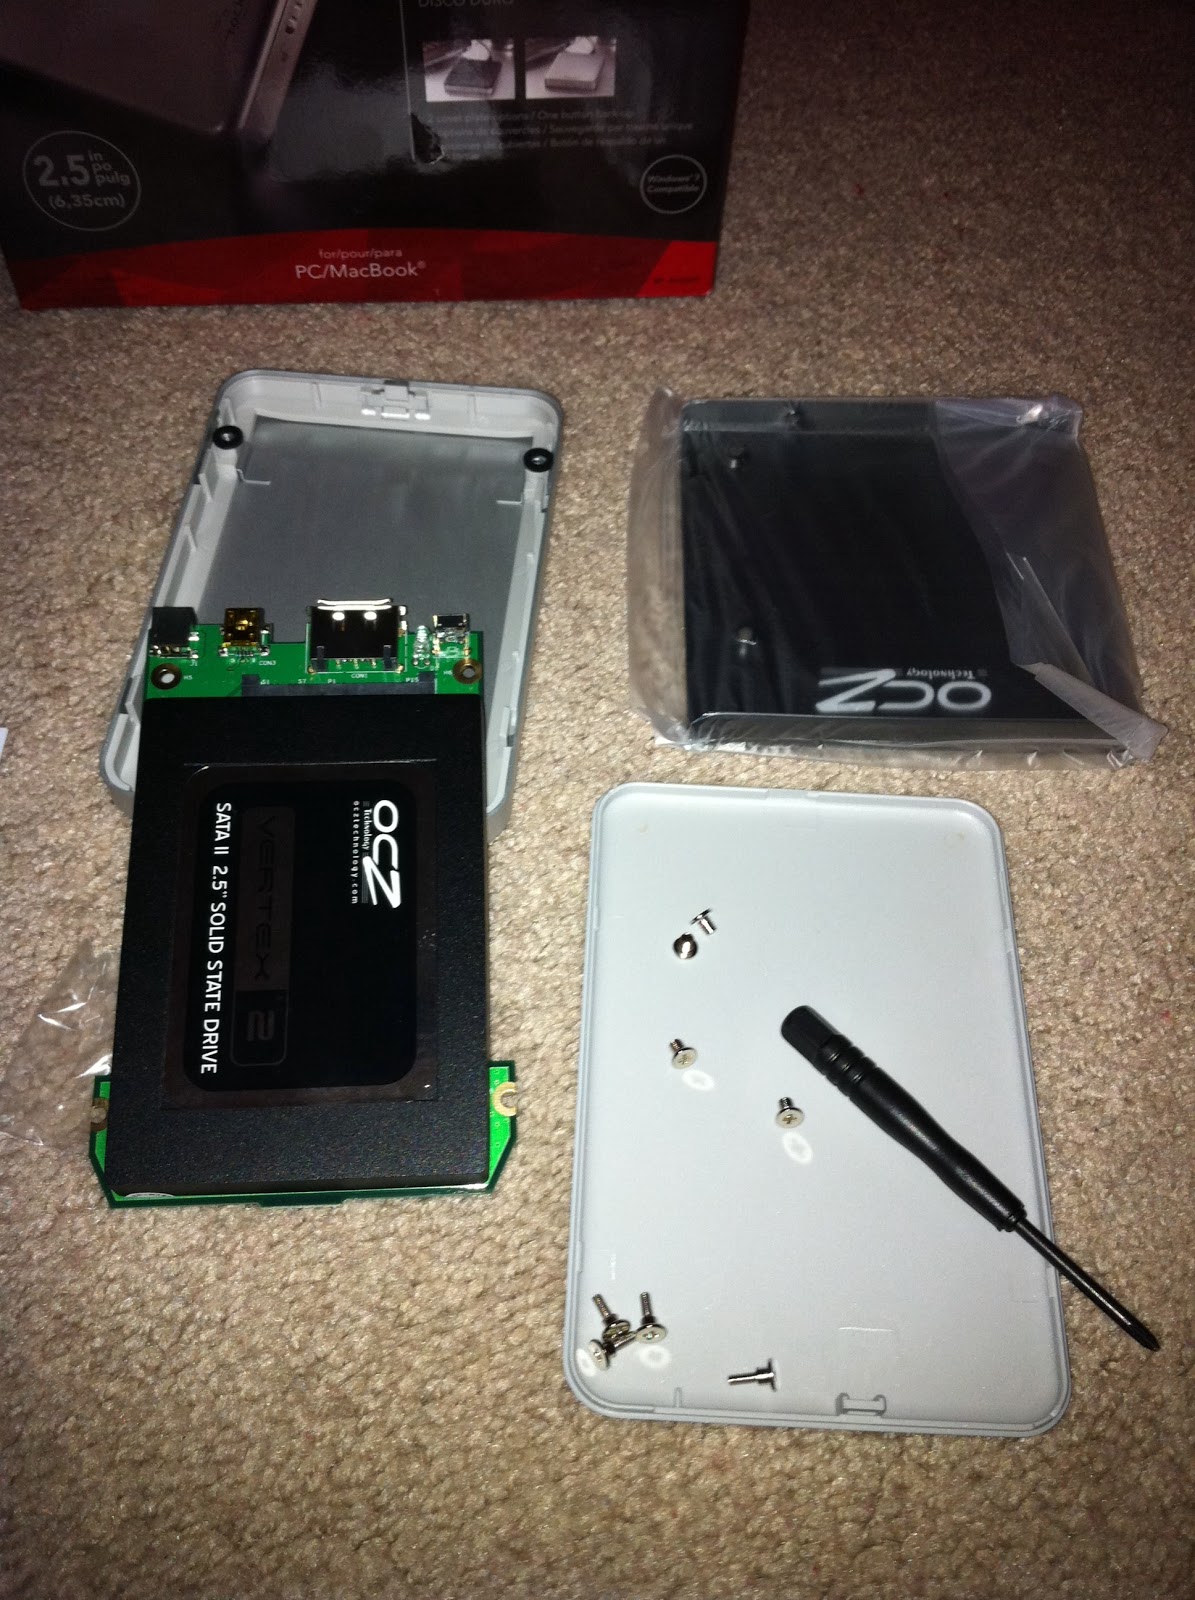
To create this environment I purchased two items, an OCZ Vertex 2 240GB SSD and a RocketFish 2.5" SATA HDD Enclosure.  The reason for the external enclosure is twofold; first to clone the SSD from the HDD and the second to swap them long term and use the SSD for boot and the existing HDD for "Tier Two Storage" as needed.  Here's a photo of the parts and the SSD in the case:


Step One: Install the SSD in the RocketFish Enclosure (pictured above right).

Step Two: Plug the SSD in and format (Erase) the SSD drive using the Apple Disk Utility.

Step Three: Clone the Internal HDD to the External SSD.  For this step I picked Carbon Copy Cloner.  It is very easy to use, just pick the source and the destination and click clone.  As you can see it took me 2.5 hours for this to clone 142 GB.


Step Four: Swap the internal and external drives.  This step requires a small phillips screwdriver and a Torx T6 screwdriver.  I followed this video from Other World Computing:


Step Five: I swapped the drives and powered on the laptop and got the following.  My first thought, this isn't good!!


Here is where I learned a little about about Mac OSX. Unlike Windows, the system was still looking for the old internal hard disk.  So, I plugged in the old HDD into the USB and the system booted again!  From there I went into System Preferences and changed the SSD to be the boot drive.  One reboot and I was back in business!


Lastly, I ran Xbench to see the before (top) and after (bottom) results.  So far, I'm loving it and will post more as I get the lab setup.

UPDATE: Make sure you read my follow up article on how to maintain the SSD performance over time.


Monday, September 20, 2010

Keeping the vMotion Tiger in the 10GB Cage - Update

There has been a lot of activity regarding my post from last Sunday.  Again, all credit goes out to Don Mann and the ePlus Engineering Team (Rob Quast in particular) for all their hard work surrounding Don's presentation at VMworld.  The title of the session was 10GB and FCoE Design Considerations and it was great!  If you get a chance to catch it on the VMworld replay, I highly suggest it.

I wrote the first post because even though vSphere 4.1 has been out for a few months, it is Don's session that set off the light bulb in my head that made me start asking questions.  I wanted to know from VMware if it was true that vMotion (and really any traffic that isn't controlled) can saturate a 10GB link with vSphere 4.1.  Is this a new design criteria that I now MUST consider?  I asked on the forums and it was confirmed by none other than Dilpreet himself.  Thank you again Dilpreet for taking the time to post!

In the meantime, Sean McGee and Brad Hedlund also wrote articles to further explain the concepts as well as lay out some architecture solutions.  Sean's post is here and Brad's post is here.  Please take the time to read them both, great stuff!

Due to some other things going on, I won't be posting the follow ups that I promised in Part One.  I'm very sorry about that and I hope to get to them someday but the circumstances right now just won't allow that to happen.  Besides, Sean and Brad did a great job (probably better!) than I could have.

Sunday, September 12, 2010

Keeping the vMotion Tiger in the 10GB Cage - Part One

I had a light bulb moment as I was sitting in fellow ePlus employee Don Mann's session at VMworld.

A little background is needed first.  In vSphere version 4.0 we didn't really have a need to control the traffic in 10GB connections.  Even if all the traffic types were combined into a single connection with no traffic management, you rarely ran into contention on the link.  vMotion was the most likely to act up due to the "bursty" nature of the traffic pattern (hit the connection really hard for a few seconds until the vMotion is complete and then settle down) but this was limited because vMotion in vSphere 4.0 was capped at two concurrent vMotions at about 2.6 Gbps each for a total of 5(ish) Gbps maximum for vMotion.  If you assume a little over 9 Gbps usable capacity (the rest lost to protocol overhead) on a 10GB link you still have room for other traffic and you never burst high enough to saturate the network.

Then, along came vSphere 4.1....

vSphere 4.1 introduced significant performance enhancements to vMotion over 4.0.  vSphere 4.1 increases the number of concurrent vMotions to eight in a 10GB environment and the speed has been increased to 8 Gbps.


When I heard this, a light bulb went off in my head and I've been poking at this idea with a stick for awhile now.  I've asked around in the community over the last few days and there seems to be confusion over the numbers.  Does that mean eight vMotions, each one at 8Gbps for a total of 64 Gbps maximum or does that mean eight concurrent vMotions consuming a total of 8Gbps maximum.  I don't have a definitive answer to this question but tests I have seen conducted point to EACH vMotion consuming up to 8Gbps each.  If this is true, anything above ONE vMotion at a time without some form of traffic control may not be a good thing!

Does it matter if I'm utilizing 64 Gbps for vMotion or 8Gbps for vMotion??


The more I think about it, it really doesn't.  Let's assume best case for a second and say that eight vMotions will consume a total of 8Gbps (I don't think it works this way but I'm being an optimist).  If vMotion can consume a maximum of 8Gbps of a 10GB pipe, you will need to design around this fact.  Some form of Traffic Shaping and/or Quality of Service to manage the traffic will be necessary in 4.1 when it was often considered optional previously.

I did a little digging and the issue is confirmed in VMware's NetIOC Best Practices document.  To summarize, your results may vary (and not in a good way) if you aren't putting some form of control on your vMotion traffic in conjunction with 10GB links.

Oh, before I get a bunch of comments telling me this: I'm picking on vMotion here but you could just as easily perform a global replace in this article with (your favorite chatty and/or spikey traffic type) for vMotion in this article.  The concepts to solve network congestion are the same.

How do we solve this issue?

There are two main ways to solve bandwidth contention.  One is to place a cap on the amount of traffic vMotion can use.  This is often referred to as rate limiting the links.  The second is to give priority based on a weighted system that kicks in when contention takes place.  This is called Quality of Service or QoS.  With QoS, everyone gets some bandwidth, but no one is allowed to take over completely and priority is given to critical traffic.  I wrote an article on the concepts in the past here and Brad Hedlund wrote a great article on the concepts with cool Flash animations here.  Don't get hung up that we both wrote about HP and Cisco, the concept of rate limits vs QoS still stands.

In my opinion a QoS or shares based priority model is much more effective to control this traffic.  This allows for better utilization of the bandwidth and provides a more flexible alternative to rate limiting.

How do Rate Limits and QoS fit into vSphere?

Here is a simple graphic to illustrate the virtual switch options in vSphere today:


This concludes the first article in this series.  I will explore the rate limiting options (vSS and vDS with 4.0) in the next article and conclude with the QoS based options (vDS with 4.1 and Cisco 1000v).

Lastly, a big Thank You!! to the following people for their help on the article and for allowing me to bounce questions off them: Don MannRon FullerJoe Onisick, Sean McGee, Brad Hedlund & Stevie Chambers

Do you any information to add?  What are your thoughts?  Please leave a comment!

Monday, March 15, 2010

Cisco UCS QoS vs. HP Flex-10 vNICs in VMware

This post will be more conceptual than technical.  I recently was asked how Cisco's UCS &  HP's Flex-10 network design approaches affect vSphere designs.  Even though the industry is moving towards a unified 10GB fabric, there are different ways to move data through this big "pipe" and still ensure/prioritize delivery.  As you would guess, Cisco and HP approach this problem very differently.  Cisco takes a network centric approach to the problem and HP takes a server centric approach to the problem.

HP's Flex-10

HP Flex-10 takes a 10GB connection and carves it up into multiple virtual NICs.  The size of the "pipes" can be turned up and down to match the amount of bandwidth needed for the NIC.  Think of it as placing smaller pipes in the big 10GB pipe.  This approach is great for vSphere admins because the virtual switches in vSphere can be configured to look just like they did with a bunch of 1GB links into the server.  The transition to this technology is seamless for the vSphere administrator.  I'll borrow a diagram from Barry's awesome article on Flex-10.  If you haven't read it, please do!


What is the down side to this method?
The down side to this approach is by placing multiple pipes within the larger pipes, you have now placed a CEILING on how much data can pass through that particular pipe.  Let's say you present a 1GB vNIC to vMotion and during a vMotion it would be to your advantage to have access to more bandwidth.  Too bad, 1GB is all you will ever get.

 Cisco UCS's QoS

Cisco UCS uses a method known as Quality of Service (QoS).  Most of us "server guys (and gals)" have no idea what this is.  Here is how I have come to understand it.  If this is wrong, please correct me.  Network traffic is given a priority and this priority kicks in WHEN THERE IS CONTENTION on the network.  So, instead of smaller pipes inside a large pipe, you have more of a priority system in place to guarantee certain levels of service.  Think of this as a FLOOR model.  You can have as much as you want as long as everyone else gets their minimums (they get their quality/guarantee of service).  If something needs to spike and there is room, it can spike and then return to normal.  Here is a diagram of our Cisco UCS with traditional switches.  This isn't 1000v but you get the idea.  As you can see, two big 10GB pipes into the virtual switches instead of smaller pipes into multiple virtual switches.


As the vSphere administrator, this looks very different from my old multiple 1GB links into my multiple virtual switches!

What is the down side to this method?

At this time, QoS for Cisco UCS appears complex to configure and represents a shift in thinking for the vSphere administrator. 

How is the QoS implemented for Cisco UCS and VMware?

That is a very good question.  I can't seem to find any documentation on how to actually do this yet.  I'm sure there is a Cisco internal doc somewhere but I haven't found anything public that lays out the hardware that is needed (do I need 1000v or Palo for this, can I use a CNA and the standard switches?) nor have I found a "cook book" that documents how to properly make QoS happen in a vSphere environment.  I'm sure this will happen in time and if you have a link, please leave a comment!

Which is better?

It depends on your point of view and the comfort level of your team.  I can easily see advantages to both approaches.  One is easier to implement, the other appears to be a more elegant (but complex) solution.  Cisco has once again brought a disruptive technology to the table that can't be ignored.  What are your thoughts?

Monday, January 18, 2010

Installing NetApp VSC According to Best Practices

If you haven't checked out NetApp's Virtual Service Console, you should.  I did an article on it after NetApp Insight which is available here.

Vaughn recently posted on setting up VSC access to the NetApp using RBAC (Role Based Access Control) permissions.  This procedure is not currently in the VSC manual.

Quick tangent: Creating RBAC for every product appears to be an ongoing trend within NetApp.  Documentation exists for RBAC installation on SMVI (it's in the manual), VSC (link above), Snap Drive in a virtual machine, and I think there is a RCU writeup around but I can't find it right now.  This is great from a security perspective but gets a little tedious if you are loading multiple products on the same NetApp controller, and double the pain if it is an HA unit! (HINT to NetApp, figure out a way to consolidate this please!!)

Let's say you were an early adopter to VSC and installed it per the manual.  You probably used root as the user id and you never enabled SSL on the filer.  If this is the case, you are sending the root password in clear text (Yikes!).  Based on Vaughn's article we can easily go back and fix this.

  • Configure and Enable SSH on each NetApp Controller if not already enabled
    • From the command line you can use the secureadmin setup ssl and secureadmin status  command as shown below. This can also be configured from FilerView -> Secure Admin
  •  Create the role, group, and user on each NetApp controller. Enter each line from the command line
    • useradmin role add vsc-role -a login-http-admin,api-aggr-list-info,api-cf-get-partner,api-cf-status,api-disk-list-info,api-ems-autosupport-log,api-fcp-adapter-list-info,api-fcp-get-cfmode,api-license-list-info,api-lun-get-vdisk-attributes,api-lun-list-info,api-lun-map-list-info,api-nfs-exportfs-list-rules,api-qtree-list,api-snmp-get,api-snmp-get-next,api-system-get-info,api-system-get-version,api-volume-autosize-get,api-volume-list-info,api-volume-options-list-info
    • useradmin group add vsc-group -r vsc-role
    • useradmin user add vsc-user -g vsc-group
  • From the vSphere Client, go to the NetApp tab, Repeat the following for each controller
    • Right Click on the controller and click Modify Credentials
  • Enter the newly created vsc-user id and password, check Use SSL and click OK

Congratulations, you have just configured your vCenter Server to communicate with the NetApp systems in safe and secure way!

    Wednesday, January 13, 2010

    Creating VMware NFS Datastores on NetApp in 3 Easy Steps

    I am often asked by customers how to set up a VMware NFS datastore on NetApp storage.  The first time I received the question, I pointed them to the NetApp vSphere TR.  It turns out the information isn't currently in the document.  I spoke to Vaughn about it and this was an over site that will be corrected.  In the meantime, here is how I create NFS shares in 3 easy steps. I'm also taking screenshots from my lab for the first time, let me know what you think of the screenshot format vs. just a bullet list.

    Step One - Create the volume on the NetApp system
    •  Log into FilerView, Open Volumes, Click Add -> Click Next
    • Accept the default value of Flexible Volume and Click Next
    • Create a name for the volume, set the language type, and click Next
    • Choose which aggregate to create the volume in and click Next
    • Set the size of the Volume, please notice the pull down defaults to MB NOT GB!, I typically don't set a Snap Reserve but if you don't understand the implications of this, just use the default of 20%. Click Next

    • Click Commit
    • Click Volumes -> Manage to and you will see the newly created volume


    • If your NetApp system has been configured for CIFs, you will need to make a slight change to the Q-Tree type of the volume.  Click Volumes -> QTrees -> Manage.  If the QTree type is UNIX, skip to Step Two.  If the QTree type is NTFS, proceed.

    • Click on the volume link (sim3_vmware_01 in this example) to get the following screen
    • Change the QTree type to UNIX and click Apply

    Step Two - Create the NFS Export (Share the Volume)
    •  Click NFS -> Manage Exports -> Click on the Permissions for the newly created volume


    •  Make sure Read-Write Access, Root Access, and Security are all checked. Click Next

    • Click Next at the Export Path Screen but write down this path, you will need it later!
    • At the Read-Write Access Screen, uncheck the All Hosts box and enter the ip addresses of all the VMkernel ports for the vSphere server(s).  NOTE: This is not the Service Console IP address, it is the VMkernel ip address that vSphere will use to "talk" NFS to the storage
    • Repeat this process for the Root Access Screen and click Next
    • Click Next at the Security Menu accepting the defaults
    •  Click Commit. You are now finished configuring the NetApp System!
    Step Three - Create the share in vCenter

    • From the vCenter Client, Click on a vSphere server and click the configuration tab. Click Storage, Click Add Storage

    • Choose Network File System and Click Next
    • Enter the IP address of the NetApp Storage, the path to the export that you wrote down from step 2, and give your datastore a name as it will appear in vCenter

    • You should now see your storage


    UPDATE: I was hoping to stay away from the command line for this article.  This was really designed for users that are just beginning to get their feet wet with NFS.  But, as Mike pointed out, there is one command that should be run on each volume and this can only be achieved from the command line.  It is outlined on page 37 of the 1.0 version of the TR.  The command is: vol options (volume-name) no_atime_update on where volume name is the name of the volume (sim3_vmware_01 in my example).  Thank you for pointing that out Mike!


    A few final notes.  Once all of this is complete I usually test read/write access by pulling up the datastore browser and creating a folder in the datastore and then deleting it.  Also, if the datastore will be protected by NetApp's Snap Manager for Virtual Infrastructure then I will disable snapshots.  This is all detailed in Vaughn's vSphere TR.