By following the settings in this post you will have a Facebook Timeline that is set to Friends only viewing for both past and future posts. In addition, you will have the power to approve when you are tagged before an item is posted, limit the information your friends' applications will be able to access, and lastly, disable people from subscribing to your public page.
Let's start by setting your Privacy Settings.


In the pop up window, I accepted the defaults except for the third setting, Review Posts Friends Tag You In. If you enable this setting, you will have the ability to approve any item before it appears on your Timeline. It will still appear on their page but it won't show up on your's until you approve it. I changed this setting to Enabled, Clicked Back, and then Done to return to the Privacy Settings Page


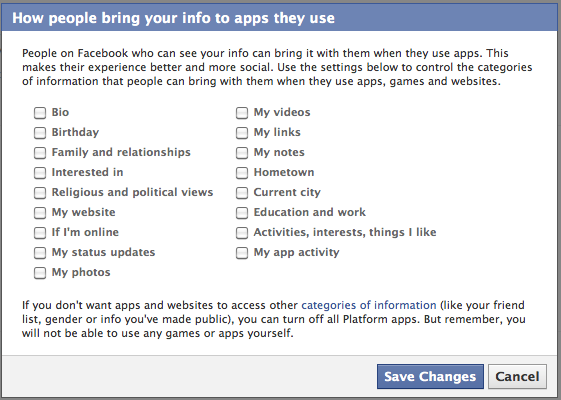
The next setting is tricky and I took my settings from this article. Even the title of the setting is confusing: How people bring your info to the apps they use. Basically, if you are friends with somebody they can use an app to pull your information into that app (and that company has your information). I just don't think this is cool. I also don't really use a lot of apps or play games on Facebook. It just isn't my thing. I would recommend that you just disable everything. Click Save Changes.


To access your Privacy Settings, click the down arrow next to Home in the upper right corner of your Facebook page and then click Privacy Settings.
- 1. Control Your Default Privacy - The first thing I would recommend is to modify the Control Your Default Privacy setting in the middle of the page to Friends if it isn't set already. With this setting, all future posts will be viewable by Friends only unless you specify otherwise.

- 2. Limit the Audience for Past Posts - Next, skip a few down to the Limit the Audience for Past Posts setting. I recommend limiting all past posts to Friends Only as well. You never know what was set a few years back so it is better to be safe than sorry. Click Manage Past Post Visibility on the right.

On the pop up screen click the Limit Old Posts button. After that click Confirm on the next pop up and finally click Close on the last pop up.

- 3. Enable Timeline - If you already have Timeline for your profile, skip to the next step, How You Connect. Now that you have set all past and future posts to Friends only, let's enable Timeline. To enable Timeline, go to the Timeline page and click the big green Get Timeline button in the bottom right corner.
You can play around with what will be displayed in your Timeline and when you are ready, click Publish. Don't worry about getting your Timeline perfect right now, I'm going to write a post on how to control your Timeline soon.
- 4. How You Connect - If you enabled Timeline, return to your Privacy Settings (top right corner, click the down arrow, click Privacy Settings). Click Edit Settings for How You Connect. I'm OK with people getting in touch with me so I set mine to the following. You may want to set your's differently. Click Done when you are satisfied:


- 5. Timeline and Tagging - Next up we have Timeline and Tagging. Click Edit Settings.

In the pop up window, I accepted the defaults except for the third setting, Review Posts Friends Tag You In. If you enable this setting, you will have the ability to approve any item before it appears on your Timeline. It will still appear on their page but it won't show up on your's until you approve it. I changed this setting to Enabled, Clicked Back, and then Done to return to the Privacy Settings Page


- 6. Apps and Websites - Next, on the Privacy Settings page we have the Apps and Websites setting. Click Edit Settings.

- 7. How people bring your info to apps they use - This is the second one down on the list. Click Edit Settings.


- 8. Apps you use - The top setting is Apps you use, click Edit Settings.

The App Settings page will show all the applications you have given access to your data. Do you really want all of these applications (and the company that makes them) to have access to your data? If you are like me you will have a long list of applications (What 80's song are you, Pieces of Flair, etc.) you used once and haven't used since. Click the x next to any applications that you don't use anymore. You will get a pop up window asking you to confirm, click Remove.

- 9. Subscribers - OK, last setting for today, I swear. Click on Subscribers on the left hand side. By default, subscribers are enabled. If you do not want this feature, uncheck the allow subscribers box. I allow subscribers to my page but that is only so I can post blog announcements there.

By using all of the above settings you'll be safe from Mr. Zuckerberg's prying eyes, at least for now. I plan to post about how to further secure individual posts on your Timeline as well as customize your news feed to your liking. Look for those articles soon. Thanks for coming by!
Posts used to create this article:
4 comments:
Aaron,
Great tips! I agree with all of these, especially the "Limit Old Posts" setting.
There are tons of apps that do nothing but datamine old content.
One other thing I would recommend is a frequent backup or "Download" from the Account Settings page of your entire profile.
Heed this warning, or else you might be mistakenly tagged and have your profile shut down. Check this out:
http://datacenterdude.com/non-tech/facebook-disabled-account-underaged/
Hey Nick! Hope you're doing well!
Yeah, I saw that on Twitter, Bummer!!
Thanks for the link!
-Aaron
Aaron, I agree...GREAT post! I think most of those I've already done, but will be re-reviewing to make sure. Thanks for posting and yes...very much worth posting.
Thanks!
Shane
(@coolsport00)
Great post especially documenting the process. But one thing is for sure...Facebook has definitely been influenced by G+. Not only do we have to think about ways to lock down our Facebook experience, but we also have to think about the content we are sharing. G+ created circles which helped those on Facebook to find "Lists" and "Subscribe". This allows us to funnel our updates to the right people so we do not overload people in our private Facebook arena.
Post a Comment